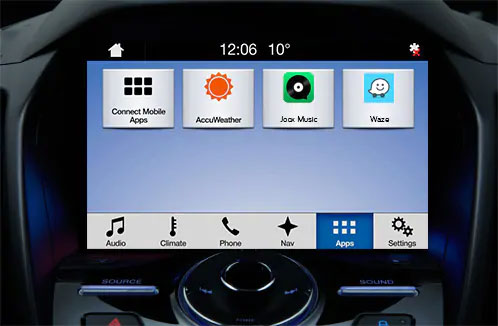
Sync 3 Support

SYNC™ SUPPORT

Getting Started

Get directions with SYNC™ 3

SYNC™ 3 SUPPORT

Get Directions with SYNC™ 3

Just enter your destination to get directions with SYNC™ 3 navigation features (if equipped). This convenient travel experience was designed around you, providing traffic and weather-related conditions, potential delays, and points-of-interest (POI) along your route. This helps you reach your final destination safely, while keeping your eyes on the road and your hands on the wheel.

Optimise your route

You can set your map, route, and navigation preferences to personalise what SYNC™ displays during active navigation. To access these features, press the Settings icon in the Feature Bar, and then press the Navigation icon. Choose from the following options:

  • Press Map Appearance to have SYNC display 3D city models (if available), Landmarks and POI icons on the touchscreen map as they appear along your route. You can also select from a variety of Incident Map icons that alert you to conditions that may affect your route such as traffic jams, weather warnings and more. 
  • Press Route preferences to tell SYNC how to calculate your route. You can select Fast, Easy or Short. (The default route is Fast)
  •  Press Sound to select the prompts you want SYNC to use during navigation. Disable or Enable Voice guidance, or adjust Verbosity Level for how much and how often SYNC prompts you.

Planning a Multipoint Route

To build your route destination-by-destination, perform the following steps:

  1. Tap the menu button on the Navigation view to access the Navigation menu.
  2. Tap Multipoint Route icon.
  3. On the Multipoint Route screen, there is only one line in the list of route points, the starting point of the route; which is by default the current GPS position.
  4. Tap Destination + to select the destination.
  5. The New Route to… screen appears, where you can select the destination of the route by Address, Places, Saved Locations etc.
  6. When the selected location appears on the map, tap Select as Destination and the list returns.
  7. To add more route points, tap Insert Waypoint + or tap Final Destination + to change the final destination. The Add to Route… menu appears again, where you can select the new route point.
  8. (optional) Tap the dropdown arrow button to optimise the whole route or the order of waypoints. You can also delete all the destinations.
  9. When you have added all the route points, tap Calculate Route and the planned route is automatically calculated.
  10. Tap Start Navigation to start your journey.
 

How to set home, work and favourite locations using SYNC™ 3

SYNC™ 3 SUPPORT

How to Set home, work and favourite locations using SYNC™ 3

Quick Access to Frequent Destinations

The SYNC™ 3 Navigation system (if equipped) lets you create a list of favourites so you can access your home, work, or other frequently used routes with ease. No matter where your journey takes you, this convenient feature helps you safely navigate to your favourite destinations with just a few taps of the touchscreen.

To add your home and work address to the saved locations, perform the following steps:

  • On the Navigation view, tap the menu button, New Route, and Saved Location.
  • Select HOME or WORK. Tap OK to confirm your selection.
    The fastest way to search is to use combined search, however you can also initiate a separate search for Addresses, Places, Saved Locations, or Recent Destinations. 
  • Perform the following steps to use combined search:
    Tap Search in all. You will see two input fields at the top of the screen. The right input field allows you to use the keyboard to search and set the search area, town or country around which the search is carried out. The default search area is the area where you are currently located.
    After the proper search area is displayed, start entering the Name, Address, or Category of the destination you are looking for into the left input field.
    Tap the magnifying glass icon to switch to the result screen. You can see all the results in the list, regardless of their type. Addresses, Places, Place Categories, Saved Locations, and Recent Destinations are mixed in one list. You can immediately select the result you want to use as your destination or narrow the list of results for only one type (for example, Places).
  • Once the destination is selected, a full screen map appears with the selected point in the middle. If necessary, tap the map somewhere else to modify the destination. The cursor icon appears in the new location.
  • When the map appears with the selected location in the middle, tap the dropdown arrow button.
  • Tap Save Location.
    (optional) Using the keyboard you can change the name offered for the Saved Location, then Tap the “tick” icon to save the location.

To set your saved HOME or WORK address as your destination, perform the following steps:

  • On the Navigation view, tap Menu button, New Route, and Saved Location.
  • Select HOME or WORK. Tap OK to confirm your selection.
  • Tap Select as Destination to confirm the destination, or tap the return arrow icon to select a different destination.
    The route will then be calculated and the map appears showing the entire route, where you can check route information and route alternatives.
    Tap the downward arrow button to modify the route parameters, or tap Start Navigation to start your journey.
 

Available Apps with Ford AppLink™

SYNC™ 3 SUPPORT

Available Apps with Ford AppLink™

Getting Started

Ford AppLink™ uses voice-activated technology to connect you with some of your favorite smartphone applications. Access your favorite music and radio stations , share your location in real time with friends and family, and never miss the latest news and sports. All in the comfort and safety of your Ford vehicle via voice control.

App Commands

Once your phone is paired and connected, simply say the commands through your SYNC® system or use different buttons to start and control your smartphone applications. Check the info below to know more about the available applications for your smartphone!

How to download software updates to a computer

SYNC™ 3 SUPPORT

How to download software updates to a computer

To get the most from your SYNC™ system, always ensure you are using the latest version. You can download the latest software updates at no charge from the Owner site.

Please note:

· Ensure your Owner account has been set up, you are logged in and your vehicle has been registered on the Owners site.

· You need a USB drive that holds 2 GB or more and is not password protected. The USB must be FAT format. NTFS format do not work.

· You are logged in to the Owner site.

owner-sync-support-slide-009

Locate the SYNC™ Updates section and click Request Download to send your request to SYNC™ Updates Centre.

owner-sync-support-slide-009

Request successful window will pop up, if not, go back to Slide 1 and Request Download again. We will send a notification to your email address when the package is ready to download.

owner-sync-support-slide-009

After the file is ready, return to the SYNCTM updates section and click Start Download.
Note: Please do not download this file directly to your USB drive!
· If your browser prompts you to do so, choose to “Save” the file to your Desktop or a similar location on your computer’s hard drive.
· Keep your USB nearby. You’ll need to use it soon.

owner-sync-support-slide-009

Click Continue.

owner-sync-support-slide-009

After reading the SYNC™ Device End User License Agreement, click I Agree to confirm.

owner-sync-support-slide-009

Once the download is completed, locate the zip*file that should now be saved to your computer’s hard drive.
· You may need to navigate manually to the location to which you saved the file in step 3. (ex. ”Desktop”)
TIP: If you did not specify a location for this in Step 3, check for the .zip file in your computer’s “Downloads” or “My documents” folder. The file may have been saved to one of those folders by default.

previous arrow
next arrow

How to transfer update file to a USB drive

SYNC™ 3 SUPPORT

How to transfer update file to a USB drive

owner-sync-support-slide-009

Double-click on the .zip file to unzip and open it.

If your computer has a third party extraction program such as WinZip, 7-Zip or WinRAR, you can also use that option to unzip and extract your file. For more information on how to unzip and extract files using one of these programs, see the corresponding third party developer’s website.

owner-sync-support-slide-009

Select all of the items inside the unzipped folder. Drag and drop them onto your USB drive.

NOTE: Installing the software update files in your vehicle works only if the SyncMyRide folders and additional file(s)* are visible on the USB drive. Don’t combine or delete any of the files.

owner-sync-support-slide-009

Select your USB Drive to view its contents and ensure that the correct folder and files are listed.

*Your filename(s) and number of files may differ.

owner-sync-support-slide-009

Right-click on your USB drive and choose “Eject” to safely eject the USB drive from your computer.

owner-sync-support-slide-009

Take the USB drive with you to install the updates in your vehicle.

previous arrow
next arrow

How to install the updates in your vehicle

SYNC™ 3 SUPPORT

How to install the updates in your vehicle

At certain points during the update installation, the screen in your vehicle may go dark as the system reboots. You will also hear audible “Installation Complete” messages. They refer to specific phases of the installation, not the overall upgrade process.

Please note:

  • Ensure you have already downloaded the updates to your USB.
  • Please ensure that your car is in a well-ventilated area. Your vehicle will need to be turned on, with the engine running, for about 20 – 30 minutes to complete the upgrade.
  1. Plug the USB in and wait until the screen displays “the update will last about 30 minutes” message. Press OK to start the installation.
  2. Wait at least twenty minutes to check the screen. Press OK and remove the USB if the screen displays “You have successfully updated your SYNC™ software to Gen3 – Vx.x” message. The upgrade is complete.

How to report a successful installation

SYNC™ 3 SUPPORT

How to report a successful installation

Each successful installation keeps your vehicle’s software record up to date and prevents you from re-installing old updates in the future.

Please note:

· Make sure you have installed the latest SYNC™ software update.

owner-sync-support-slide-009

1.Plug in the USB used to install the software update into your computer.

2.Log in to the Owner site.

3.In the Update & Customize section, click Report Update.

owner-sync-support-slide-009

4. Please open the folder ‘SyncMyRide' in your USB and select the .xml file which is created after your installation and upload it.
For example: Sync_ER3F2105.xml. *Your xml filename may be different.

5. Click Report Installation. Your update will then be reported, completing the update process.

previous arrow
next arrow

How to install SYNC™ 3 updates with Wi-Fi®

SYNC™ 3 SUPPORT

How to install SYNC™ 3 updates with Wi-Fi®

When you enable Automatic System Updates through Wi-Fi®, SYNC™ 3 will download, install and activate available system updates automatically; when SYNC™ is connected to a Wi-Fi® network. You can connect through your home or other Wi-Fi® network.

Your vehicle need not be running during automatic updates. You’ll also be able to use SYNC™ during the updating process.

Before you start, please park your vehicle within range of the Wi-Fi® network to which you’d like to connect.

owner-sync-support-slide-009

A message displays confirming the system is connecting to the network.

owner-sync-support-slide-009

The first time you use SYNCTM 3, the system may display a message asking if you would like to enable the Automatic System Updates feature.

If you agree to automatic updates, press Yes to confirm.

Note: If this message does not display, please see the Quick Tip below on performing a master reset.

owner-sync-support-slide-009

A confirmation message will appear: "Automatic System Updates: On."

Press Close.

owner-sync-support-slide-009

A confirmation message will appear: "Automatic System Updates: On."

Press Close.

owner-sync-support-slide-009

A list of networks, including the name of your mobile phone if you’re using its hotspot feature, will appear on the screen.

Press the name of the network to which you wish to connect.

owner-sync-support-slide-009

A message displays the name of the network.

Press Connect.

owner-sync-support-slide-009

nter the password required by the network.

Press Done.

owner-sync-support-slide-009

A message displays confirming the system is connecting to the network.

previous arrow
next arrow