Line voice commands

SYNC™ SUPPORT

Line voice commands

When SYNC™ isn’t in Line In (AUX) mode, say any of the following commands:

Action
Voice Commands
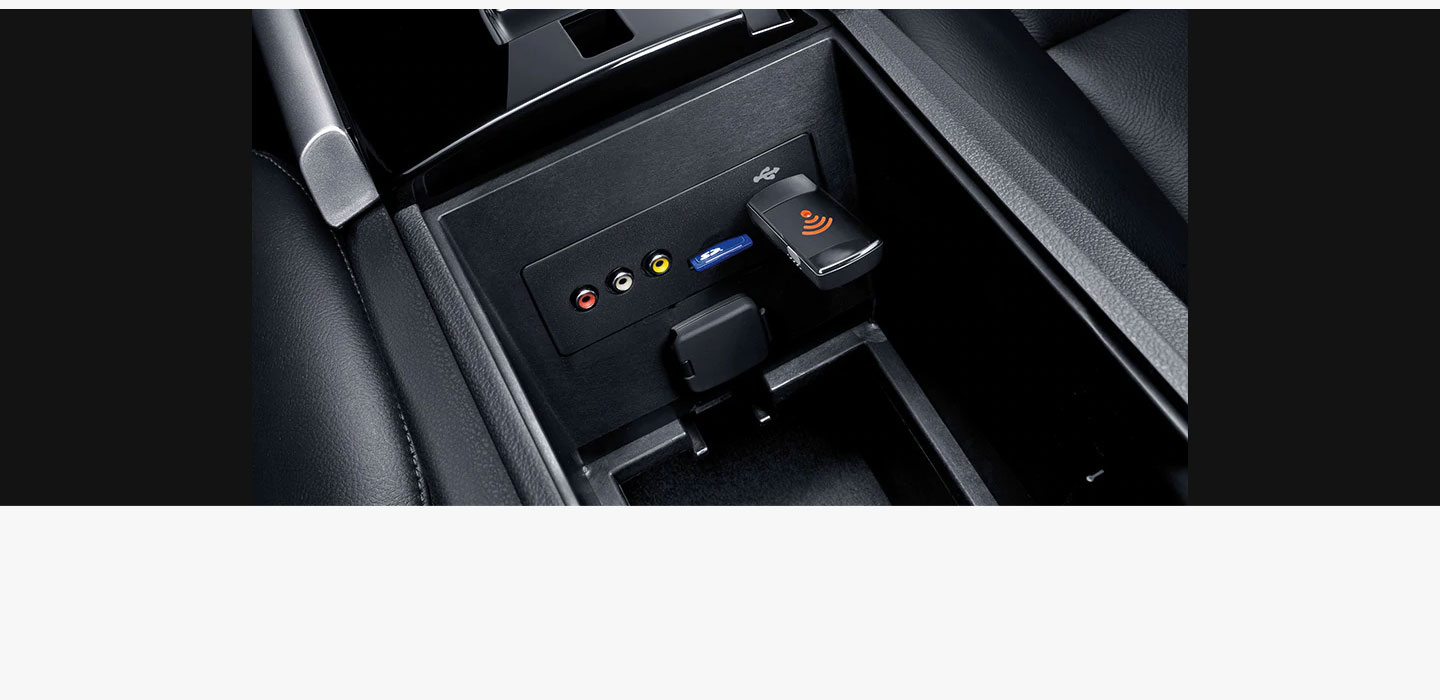
Select device connected to the auxiliary jack
“Line in”
Start playing music
“Line in”

USB voice commands

SYNC™ SUPPORT

USB voice commands

When SYNC™ is in Bluetooth® Audio mode, say any of the following commands:

Action
Voice Commands
Play a specific track
“Play track <Name>”
eg.: “Play track Symphony Number 9
Play a specific artist
“Play artist <Name>”
Play a specific genre
“Play genre <Name>”
eg.: “Play genre jazz”
Play a specific album
“Play album <Name>”
Play a specific playlist
“Play playlist <Name>”
eg.: “Play playlist Road Music
Pause or resume play
“Go to privacy”
Place call on hold / pick up call
“Pause / Play”
Play previous / next track
“Play <previous / next> track”
Turn on / off Shuffle
“Shuffle <on / off>”
Play other tracks in the
same genre / category
“Similar music”
Hear title and artist of track playing
“What’s this?”

How to download software updates to a computer

SYNC™ SUPPORT

How to download software updates to a computer

To get the most from your SYNCTM system, always ensure you are using the latest version. You can download the latest software updates at no charge from the Owner site.


Please note:


• Ensure your Owner account has been set up, you are logged in and your vehicle has been registered on the Owners site.


• You need a USB drive that holds 2 GB or more and is not password protected. The USB must be FAT format. NTFS format do not work.


• You are logged in to the Owner site.

owner-sync-support-slide-009

Locate the SYNCTM Updates section and click Request Download to send your request to SYNCTM Updates Centre.

owner-sync-support-slide-009

Request successful window will pop up, if not, go back to Slide 1 and Request Download again. We will send a notification to your email address when the package is ready to download.

owner-sync-support-slide-009

After the file is ready, return to the SYNCTM updates section and click Start Download.

Note: Please do not download this file directly to your USB drive!
•If your browser prompts you to do so, choose to “Save” the file to your Desktop or a similar location on your computer’s hard drive.

• Keep your USB nearby. You’ll need to use it soon.

owner-sync-support-slide-009

Click Continue.

owner-sync-support-slide-009

After reading the SYNCTM Device End User License Agreement, click I Agree to confirm.

owner-sync-support-slide-009

Once the download is completed, locate the zip*file that should now be saved to your computer’s hard drive.

• You may need to navigate manually to the location to which you saved the file in step 3. (ex. ”Desktop”)

TIP: If you did not specify a location for this in Step 3, check for the .zip file in your computer’s “Downloads” or “My documents” folder. The file may have been saved to one of those folders by default.

previous arrow
next arrow

How to transfer update file to a USB drive

SYNC™ SUPPORT

How to transfer update file to a USB drive

To get the most from your SYNCTM system, always ensure you are using the latest version. You can download the latest software updates at no charge from the Owner site.


Please note:


• Ensure your Owner account has been set up, you are logged in and your vehicle has been registered on the Owners site.


• You need a USB drive that holds 2 GB or more and is not password protected. The USB must be FAT format. NTFS format do not work.


• You are logged in to the Owner site.

owner-sync-support-slide-009

Double-click on the .zip file to unzip and open it.

If your computer has a third party extraction program such as WinZip, 7-Zip or WinRAR, you can also use that option to unzip and extract your file. For more information on how to unzip and extract files using one of these programs, see the corresponding third party developer’s website.

owner-sync-support-slide-009

Select all of the items inside the unzipped folder. Drag and drop them onto your USB drive.

NOTE: Installing the software update files in your vehicle works only if the SyncMyRide folders and additional file(s)* are visible on the USB drive. Don’t combine or delete any of the files.

owner-sync-support-slide-009

Select your USB Drive to view its contents and ensure that the correct folder and files are listed.

*Your filename(s) and number of files may differ.

owner-sync-support-slide-009

Right-click on your USB drive and choose “Eject” to safely eject the USB drive from your computer.

owner-sync-support-slide-009

Take the USB drive with you to install the updates in your vehicle.

previous arrow
next arrow

How to install the updates in your vehicle

SYNC™ SUPPORT

How to install the updates in your vehicle

• Ensure you have already downloaded the updates to your USB.

• Please ensure that your car is in a well-ventilated area. Your vehicle will need to be turned on, with the engine running, for about 20 – 30 minutes to complete the upgrade

At certain points during the update installation, the screen in your vehicle may go dark as the system reboots. You will also hear audible “Installation Complete” messages. They refer to specific phases of the installation, not the overall upgrade process.

  1. Plug in the USB drive with the update; your vehicle needs to be turned on with engine running.
  2. Press “Menu” and Select “SYNC-Settings” then Press “OK”.
  3. Select “Install on SYNC” and Press “OK”
  4. “Begin SYNC installation?” will display. Press “Yes” to confirm.
    SYNC will display “Installing SYNC file” during the process. After about 1min, SYNC will display “SYNC is rebooting…”.
  5. After 30s, SYNC prompts “your download is in progress, and your system may reboot several times during the update. Please wait about 20min until you hear SYNC system update was completed, you may then use SYNC”. The popup “SYNC is rebooting…” will disappear after about 10s, and the screen will not display anything.
    Do not remove your USB drive or turn off your vehicle or SYNC system while this update is in progress
  6. In about 20 minutes, SYNC will prompt “SYNC system update was completed. The system is now on reboot. Please wait a few moments before trying to use the system”. After 20s, SYNC will display “Installation Complete”; The system is then initializing, which may take several minutes.
  7. After initializing SYNC will prompt to Press “MENU” to exit installation mode. It is now safe to remove your USB drive and drive the vehicle or turn it off.
    To complete the process, take the USB drive to your computer to report the successful installation.

How to report a successful installation

SYNC™ SUPPORT

How to report a successful installation

Each successful installation keeps your vehicle’s software record up to date and prevents you from re-installing old updates in the future.

Please note:

• Make sure you have installed the latest SYNCTM software update.

owner-sync-support-slide-009

.Plug in the USB used to install the software update into your computer.

2.Log in to the Owner site.

3.In the Update & Customize section, click Report Update.

owner-sync-support-slide-009

4.Click Report Installation. Your update will then be reported, completing the update process.

previous arrow
next arrow

Sync 2 Support

Downloading your phonebook

SYNC™ 2 SUPPORT

Downloading your phonebook

Download your phonebook and you can call someone simply by saying their name. Turn on automatic phonebook downloading and your contact list will be updated each time SYNC™ connects to your phone.

Make Sure:

• Your phone is paired and connected

owner-sync-support-slide-009

Touch the Phone corner of your touchscreen.

owner-sync-support-slide-009

Touch Settings.

owner-sync-support-slide-009

Touch Manage Phonebook.

owner-sync-support-slide-009

Touch Download to re-download your phonebook.

owner-sync-support-slide-009

Touch On for Auto Phonebook Download, so SYNCTM 2 automatically downloads your phonebook each time it connects.

previous arrow
next arrow

How to pair your mobile phone

SYNC™ 2 SUPPORT

How to pair your Mobile Phone

To use your phone hands-free with SYNCTM, you need to pair it first. Make sure your phone’s Bluetooth® is turned on.

Note: Some smartphones use a four-digit Personal Identification Numbers (PIN) and cannot accept the six-digit PIN provided by SYNCTM. To pair this type of phone, follow the alternate instructions listed for step 4.

Make sure:

• Your phone is compatible with SYNCTM and the Bluetooth® is turned on

• Your vehicle is in Park and running, not in Accessory mode

Bluetooth® is a registered trademark of Bluetooth SIG Inc., and is used under license. Some phones are not compatible.

owner-sync-support-slide-009

Touch the Phone corner on your 8-inch touchscreen.

Touch Add Phone.

owner-sync-support-slide-009

Enter the six-digit number that appears on the touchscreen into your phone. (Four-digit PIN smartphones should follow the alternate instructions listed below)

owner-sync-support-slide-009

Connected successfully appears when your phone is paired. SYNCTM 2 will now connect automatically to your phone when you start your engine.

*If you have more than one paired phone, SYNCTM 2 will ask if you want to make this phone your Favourite. This is the phone SYNCTM 2 will automatically connect to when there’s more than one paired phone in the car. If you don’t set a Favourite, SYNCTM will automatically connect to the most recently paired phone.

owner-sync-support-slide-009

SYNCTM 2 will then ask, Set automatic phonebook download to ON? If you choose yes, your phonebook may take up to several minutes to download, depending on your number of contacts.

previous arrow
next arrow